
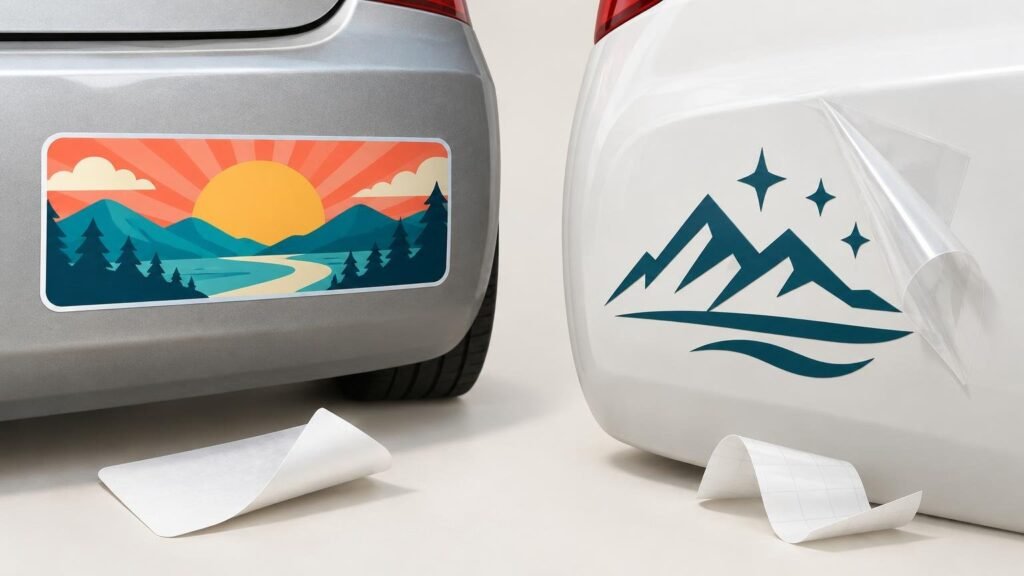
The practical difference between car decals and bumper stickers is construction. A bumper sticker is usually a printed piece of vinyl carrying the complete design, including its background. A transfer-style car decal is made from individually cut vinyl shapes or letters; the unwanted vinyl is removed, and transfer tape holds the remaining elements in position during installation.
Choose a bumper sticker for a colorful illustration, photograph, campaign message, detailed logo, gradient, or design that needs a defined background. Choose a transfer decal when you want clean lettering or a simple symbol that appears to sit directly on the paint or glass. If the project covers a substantial part of the vehicle or must conform to complex curves, neither product may be appropriate: that job can require a purpose-built vehicle-graphics film and professional installation.
The names are less reliable than the construction
“Sticker” and “decal” are often used interchangeably, so the product name alone does not tell you what will arrive. Our broader guide to the difference between stickers and decals explains why the terminology varies. For a vehicle order, inspect the product description and proof for the physical construction rather than relying on the label.
YouStickers, for example, uses “bumper sticker” for a printed, laminated vinyl product and “vinyl decal” for a weeded transfer graphic. Its current FAQ describes those transfer decals as available in black and white. That is a provider-specific distinction, not a universal rule for every printer using the word “decal.”
| Product | Physical construction | Best fit | Main limitation |
|---|---|---|---|
| Bumper sticker | One printed vinyl piece with a protective laminate | Detailed artwork, multiple colors, photographs, gradients, and messages with a background | The full sticker area remains visible, including any printed or unprinted background |
| Transfer decal | Cut vinyl letters or shapes installed with transfer tape | Simple lettering, numbers, logos, and silhouettes with the vehicle surface showing between elements | Tiny or intricate elements can be difficult to weed, position, and install |
| Vehicle-wrap film | Specialized conformable film made for vehicle graphics | Large panels, compound curves, fleet graphics, and extensive vehicle coverage | Material selection and installation are more technically demanding |
When a bumper sticker is the better choice
A bumper sticker is the straightforward option when the design should behave as one complete printed object. It can carry a rectangular slogan, a die-cut illustrated character, a multicolor business logo, a QR code with supporting text, or artwork with shading and texture. YouStickers presents its bumper-sticker product as suitable for logos, drawings, photographs, and text, including long horizontal vehicle layouts.
The vinyl is only one part of the construction. A laminated bumper sticker has a clear protective layer over the printing. YouStickers offers matte or gloss laminate for this product and states that the laminate protects against UV exposure, weather, water, abrasion, road grime, and car-wash wear. Those are the provider’s product claims rather than an independently verified service-life rating.
Finish changes appearance as well as protection. Gloss tends to make colors and dark areas look more reflective, while matte reduces sharp reflections and can make text easier to view under some lighting conditions. Neither finish can rescue weak contrast or lettering that is too small to read from another vehicle.
Bumper stickers also allow more freedom in the outer shape. YouStickers lists several standard horizontal sizes and offers custom sizing and shapes. Because dimensions and configurator limits can change, confirm the current options on the product page before building artwork around a particular size.
When a transfer decal is the better choice
A transfer decal makes sense when the desired result is separate lettering or a clean silhouette with no surrounding printed patch. Think of a business name across a rear window, a boat-style registration number, a simple mountain outline, or a small club emblem. After installation, the transfer tape is removed and only the cut vinyl remains.
This format rewards simplicity. Every isolated dot, narrow stroke, punctuation mark, and interior shape must survive cutting, weeding, transfer, and application. Very small text may look sharp on a monitor yet become impractical as cut vinyl. A printed bumper sticker can often reproduce the same detailed design more reliably because the fine elements do not need to exist as separate physical pieces.
The absence of a background is the main visual advantage. It is not the same as printing on clear vinyl. A clear printed sticker remains one continuous film, even where the artwork appears transparent. If that distinction matters for your project, compare adhesive-backed options in our guide to window stickers and window clings.
Do not confuse either product with vehicle-wrap film
Large vehicle graphics are a separate technical category. The 3M product bulletin for Wrap Film Series 1080 describes a specialized cast film with pressure-activated, repositionable adhesive and air-release channels. It is intended for vehicle graphics and specified for surfaces ranging from flat areas to moderate compound curves. Removal may require heat or chemicals.
That construction is meaningfully different from an ordinary printed bumper sticker or weeded lettering decal. Wrap-film selection considers surface geometry, installation conditions, expected service, removal procedures, and substrate compatibility. If a graphic must span a door contour, wrap around a deep curve, cover a large painted panel, or cross body seams, consult an experienced vehicle-graphics installer rather than simply ordering an oversized sticker.
Check the adhesive instead of assuming “decal” means removable
Adhesive behavior is product-specific. YouStickers states that its bumper stickers use removable adhesive, while its custom stickers, transfer stickers, vinyl lettering, labels, and front-adhesive stickers use permanent adhesive. In other words, the product called a bumper sticker may be more removable than the product called a decal.
Removable does not mean risk-free on every car. The Avery Dennison vehicle-wrap guidelines identify chipped paint, rust, non-original repainting, surface contamination, and unsuitable trim as conditions that can increase application or removal problems. Its clean-removal guidance depends on factors such as an undamaged, properly prepared original-equipment finish and use within the film’s specified service conditions.
Be cautious with fresh paint, failing clear coat, rust, chips, repaired panels, textured plastic, rubber trim, and unknown aftermarket finishes. If the condition or paint history is uncertain, ask a qualified installer or body professional before applying an adhesive graphic. For an existing sticker that has already left adhesive behind, use a removal method appropriate to the surface rather than aggressive scraping; our guide to removing sticker residue from a car covers that task separately.
Prepare artwork for the final physical size
The correct file setup depends on whether the design will be printed or cut from solid vinyl. For a printed bumper sticker, vector artwork is ideal for logos, lettering, and geometric shapes because it can be resized without becoming pixelated. PDF, AI, and SVG files can contain vector information, although merely saving a low-resolution image inside one of those formats does not turn it into a vector.
PNG and JPG files are raster images built from pixels. YouStickers recommends 300 dpi at the final printed size. That final-size condition matters: a file intended for a 10-by-3-inch sticker would need 3,000 by 900 pixels to meet a 300 dpi target. Enlarging a smaller image does not restore missing detail. PNG is usually the better raster choice when transparency is required, while JPG does not support transparent backgrounds.
For transfer decals, clean vector paths are especially useful because the paths can define the cut shapes. Convert important text to outlines or embed the fonts where appropriate so a missing font cannot substitute a different typeface. Simplify unnecessary anchor points, inspect counters inside letters such as A, B, and O, and avoid details so thin that they could lift or distort during weeding and installation.
Design for the viewing situation, not only the artboard. A driver behind the vehicle has limited time to absorb the message. YouStickers recommends short copy, bold lettering, strong contrast, and checking the design from roughly 20 to 30 feet away. That distance is a practical provider recommendation, not a universal visibility standard, but the underlying test is useful: display or print the design at its intended size and step back.
Treat the proof as the production checkpoint
The digital proof is where an uploaded image becomes a proposed physical object. YouStickers says it creates a cutline when the customer does not supply one and allows revisions before proof approval. Do not approve the proof just because the artwork itself looks familiar.
Inspect the proof for:
- Final width and height, including the orientation of a long horizontal design
- The exact cutline and whether the border is visually consistent
- Space between important text or logos and the cut edge
- Any tiny text, narrow strokes, isolated shapes, or details likely to cause production trouble
- Transparency, background color, and whether the vehicle surface is supposed to show through
- Spelling, phone numbers, website addresses, and QR-code content
- The chosen finish and the intended placement on paint or glass
Placement affects legality, visibility, and removal
A bumper or painted body panel raises different concerns from a windshield or driver-view window. Window-obstruction rules vary by jurisdiction and may distinguish among the windshield, front side windows, rear windows, and officially authorized decals.
For example, Maryland’s vehicle statute generally restricts nontransparent signs, posters, stickers, and similar material on vehicle windows, subject to specific exceptions and placement rules. The Wisconsin Department of Transportation likewise warns that windshield decals can be unlawful when they obstruct the driver’s view while describing limited allowances for authorized stickers. These examples should not be treated as a summary of the law where you live. Check the current rules for the vehicle’s registration and operating jurisdiction before placing a graphic on glass.
Even where a window graphic is permitted, keep it away from the driver’s sight lines, cameras, sensors, defroster connections, wipers, required inspection stickers, and lighting equipment. A legally placed graphic can still be poorly positioned if it reduces visibility or interferes with vehicle hardware.
Apply the graphic to a clean, sound surface
Surface preparation often determines whether the edge stays down. Wash away dirt and road film, remove wax or residue using a method safe for the surface, and let the area dry completely. Do not apply over active rust, loose clear coat, chips, or peeling paint.
YouStickers recommends applying its bumper stickers above 50°F when possible, smoothing from one edge to reduce trapped air, and waiting a few days before waxing or pressure washing the area. Those instructions apply to its product; another film may have different temperature and post-installation requirements.
For a transfer decal, position the graphic while the transfer tape still holds all elements together. Burnish it evenly, remove the backing as directed, apply the exposed vinyl without stretching it, and peel the transfer tape slowly while watching for letters that try to lift. Large graphics, complex curves, and cold outdoor conditions make alignment and adhesion harder.
What to confirm before ordering
Start with the finished appearance: a complete printed patch or separate vinyl elements. Then confirm the material, laminate or finish, adhesive type, intended surface, final dimensions, and installation method. If you compare printers, make sure you are comparing the same construction rather than two products that merely share the word “decal.” For another ordering route, CustomStickers provides custom stickers, labels, vinyl options, artwork preparation, and related printing.
- Choose a printed bumper sticker for photographs, gradients, detailed illustrations, multiple colors, or a defined background.
- Choose a transfer decal for simple lettering, numbers, silhouettes, or logos that should appear directly on the vehicle surface.
- Ask whether the adhesive is removable or permanent; do not infer it from the product name.
- Confirm that the product is intended for the exact surface: painted metal, automotive glass, plastic trim, or another substrate.
- Prepare raster artwork at sufficient resolution for the final dimensions, or submit clean vector artwork where possible.
- Review the proof at actual size and inspect the cutline, safe area, spelling, dimensions, and background treatment.
- Check local window-placement rules before ordering a windshield or window graphic.
- Use a purpose-built wrap film and qualified installer when the graphic is large, crosses complex curves, or covers extensive bodywork.
Choose by physical result, not vocabulary
For most car projects, the decision is simple once you picture what remains on the vehicle. Order a bumper sticker when you want one printed, laminated graphic with detailed artwork and a visible background. Order a transfer decal when you want clean cut lettering or shapes with paint or glass visible between them. Move up to vehicle-wrap film when size, curves, installation demands, or removal requirements exceed what an ordinary sticker can reasonably handle.
Whichever format you choose, verify the adhesive and intended substrate, prepare the file at final size, and give the proof a production-level review. Those checks matter more than whether the product page happens to call the graphic a sticker or a decal.
