If you print stickers, labels, or decals, you need clean cutlines. Printers do not guess. The cutter follows your path. In this guide, I’ll show you how to create cutlines in Adobe Illustrator with repeatable steps. We will keep it simple, practical, and fast. And yes, we will use the exact phrase how to create cutlines in adobe illustrator so you can find this later.
What a cutline is and why it matters
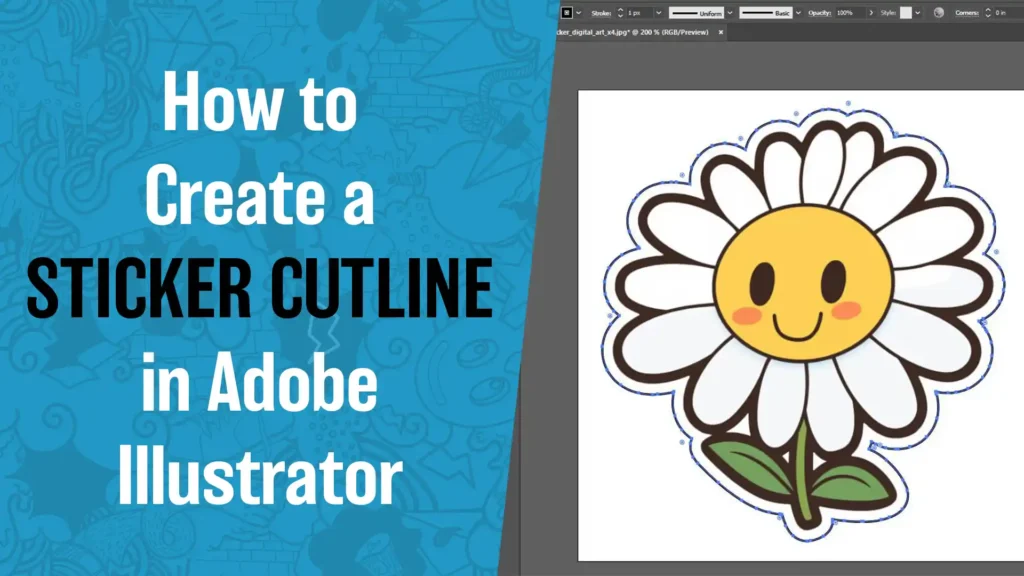
A cutline is a vector path that tells a cutter where to cut. If the path is messy, your cuts are messy. If it is clean, your stickers look pro. Most shops want cutlines as spot color strokes on a separate layer with no fill. The stroke weight is only for visibility on screen. The machine reads the center of the stroke.
You will hear a few terms. Kiss cut means the blade cuts the vinyl but not the backing. Die cut, sometimes called through cut, goes through the liner. Perforated cut uses a dashed pattern so pieces pop out but stay connected until you push them out. Your RIP or cutter software might expect specific spot color names for these, like CutContour for the main cut and PerfCutContour for perf cuts. Check with your vendor if you are unsure.
Prep your art so the cutline behaves
Before you build the path, make your artwork easy to trace.
- Outline type. Convert live text to outlines so the shape is fixed.
- Expand effects. Expand strokes and appearances that could change shape when offset.
- Duplicate the art layer. Name it Cutline and keep the original layer as Art. You will draw the path on Cutline.
- Unite shapes. If your art has lots of overlapping vectors, use Pathfinder Unite to make a single silhouette. That gives you a clean edge to offset.
Method 1: Vector art to cutline using Offset Path
If your art is already vector, this is quick.
- Select the silhouette on your Cutline layer.
- Go to Object > Path > Offset Path.
- Choose an offset that fits your look and safety. Common choices
- 0.06 in for a visible white border
- 0.03 in when you want full bleed with a tight edge
- Click OK. Illustrator draws a new path around your art.
- Delete any inside shapes that you do not want the knife to cut.
- If corners look too sharp, round them slightly with the Direct Selection Tool and the live corner widgets, or run Object > Path > Simplify with a tiny corner threshold.
Tip: After offsetting, convert the result to a single compound path. Use Pathfinder Unite, then Object > Compound Path > Make. This prevents the cutter from treating overlaps as separate paths.
Method 2: Raster art to cutline with Image Trace
Raster art works too. You just add a trace step.
- Select the image and open Window > Image Trace.
- Try the Black and White Logo preset for bold art or a 6 Colors preset for simple color pieces.
- Click Expand to convert the trace to editable vectors.
- Unite the traced shapes with Pathfinder Unite to get a solid silhouette.
- Run Offset Path as above to build the border.
If your trace is noisy, reduce small details in Image Trace or run Object > Path > Simplify after Expand. The goal is a clean outer edge with as few points as possible. Fewer points usually cuts better.
Build the CutContour spot swatch
Cutter and RIP software look for spot color names, not RGB or CMYK process colors. The classic name is CutContour. Here is the safe setup.
- Open the Swatches panel. Click New Swatch.
- Name the swatch CutContour. Exactly that spelling and capitalization if your RIP requires it.
- Set Color Type to Spot Color. Pick a bright preview color. Many people use 100 percent magenta so it stands out.
- Click OK.
- Select your cut path and apply the CutContour swatch to the stroke. Remove any fill.
- Open Window > Attributes and check Overprint Stroke. This prevents accidental printing of the cutline.
If you also need a perf cut, create another spot swatch and name it PerfCutContour if your RIP supports it. For a kiss cut on sheets where the outer die cut happens later, create a separate swatch and layer, then apply dashed lines in your RIP if required.
Safety, bleed, and radius that actually works
Cutters do not like impossible corners. Give yourself a minimum corner radius that matches your printer’s finishing. A simple rule is to avoid razor points. Round corners look better and cut cleaner.
Bleed is the extra artwork that extends past the cutline so you do not see unprinted vinyl at the edge. For most sticker work, add at least 0.03 in of bleed beyond the visible art, and keep text and small details 0.05 in inside the cutline. If you are working with special films like holographic, the same rules apply.
Layering and naming so prepress is painless
Keep your file tidy.
- Art on one layer, Cutline on another.
- Lock the art layer when you edit the cut path.
- Name spot swatches clearly. Keep CutContour and PerfCutContour consistent across files.
- If the sticker has an inner cut like a window or a hole, make sure your cutline is a single compound path with both the outer and inner paths. The inner path should be a subpath in the same compound shape, not a separate object.
Export settings that keep the cutline alive
Most printers accept AI or PDF. The key is to preserve spot colors.
- AI: Save as a native Illustrator file. Do not rasterize the cutline.
- PDF: Save as PDF/X-1a or similar, but leave Preserve Illustrator Editing Capabilities on if your shop edits cutlines. Make sure Convert to Process is off for spot colors.
- Do not flatten transparency in a way that converts the stroke to a fill or turns your spot color into process CMYK.
If your RIP is not seeing the cutline, check three things fast. Is the swatch a Spot Color, not Process. Is the name exactly what the RIP expects. Is the stroke on a vector path with no fill.
Troubleshooting that saves you reprints
Pathfinder will not Unite
Select everything and Object > Expand Appearance first. Release clipping masks. Try Unite with the Alt or Option key to create a compound shape, then Expand. If you still get holes, look for self intersections and Simplify the path a bit.
Cutter double cuts or chases a second path
That often happens when the object has both a fill and a stroke and you expanded them into two stacked paths. Keep your cutline as a stroke only. Delete duplicate outlines.
RIP ignores the cutline
Check spelling and case of CutContour. Make sure the color type is Spot Color. Some RIPs only recognize very specific names. If needed, import the vendor’s swatch library so you cannot mistype it.
Offset Path makes spikes
Lower the miter limit in the Stroke panel or round the corners. Simplify helps tame point-heavy edges.
Quick variations you will use a lot
Sticker sheets
Group each sticker with its own cutline, then add one outer sheet cut on a separate layer and spot swatch. Use a through cut name for the outer edge and kiss cut for the individual stickers.
Perforated edges for tear out
Use a perf cut spot swatch. Many RIPs let you convert a spot stroke to a dashed perf pattern automatically. Keep your perf strength balanced so the sheet stays together until you tear it.
Reverse cuts or windows
Add subpaths inside your compound cutline. Test a small sample before you run the full job.
Why this process works
You are giving the cutter a single, unambiguous vector path. The spot color flags that path as cut data. Overprint makes sure the stroke does not print. The offset value gives you visual breathing room and bleed. Clean, named layers make the prepress handoff painless.
If you prefer not to build cutlines, many shops will do it for you when you upload your file, usually after you approve a proof. If you do build them yourself, the steps above will keep your files fast, clean, and easy to cut. And if you ever forget, search this post again with the phrase how to create cutlines in adobe illustrator. It will bring you right back.

